DnCNN - Residual Learning of Deep CNN for Image Denoising
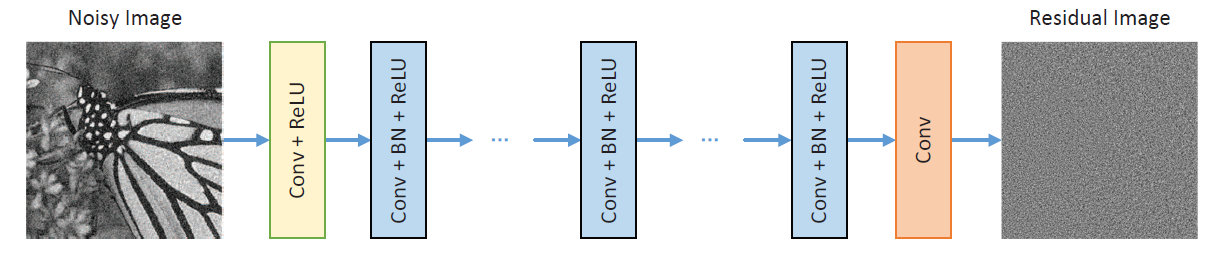
The DnCNN (Denoising Convolutional Neural Network) is a deep learning model designed for image denoising tasks, offering state-of-the-art performance by learning end-to-end mappings from noisy to clean images. It employs a deep architecture consisting of several convolutional layers without any fully connected layers, enabling it to efficiently handle various noise levels through a single model. The network leverages batch normalization and residual learning to speed up training and enhance denoising performance, making it a powerful tool for enhancing image quality in applications ranging from photography to medical imaging.
Features
| Feature | Description |
|---|---|
| Efficient Implementation | Utilizes an optimized DnCNN model architecture for superior performance on diverse image segmentation tasks. |
| Custom Dataset Support | Features easy-to-use data loading utilities that seamlessly accommodate custom datasets, requiring minimal configuration. |
| Training and Testing Scripts | Provides streamlined scripts for both training and testing phases, simplifying the end-to-end workflow. |
| Visualization Tools | Equipped with tools for tracking training progress and visualizing segmentation outcomes, enabling clear insight into model effectiveness. |
| Custom Training via CLI | Offers a versatile command-line interface for personalized training configurations, enhancing flexibility in model training. |
| Import Modules | Supports straightforward integration into various projects or workflows with well-documented Python modules, simplifying the adoption of U-Net functionality. |
| Multi-Platform Support | Guarantees compatibility with various computational backends, including MPS for GPU acceleration on Apple devices, CPU, and CUDA for Nvidia GPU acceleration, ensuring adaptability across different hardware setups. |
Getting Started
Requirements
| Requirement | Description |
|---|---|
| Python Version | Python 3.9 or newer is required for compatibility with the latest features and library support. |
| CUDA-compatible GPU | Access to a CUDA-compatible GPU is recommended for training and testing with CUDA acceleration. |
| Python Libraries | Essential libraries include: torch, matplotlib, numpy, PIL, scikit-learn, opencv-python |
Installation Instructions
Follow these steps to get the project set up on your local machine:
| Step | Instruction | Command |
|---|---|---|
| 1 | Clone this repository to your local machine. | git clone https://github.com/atikul-islam-sajib/DnCNN.git |
| 2 | Navigate into the project directory. | cd DnCNN |
| 3 | Install the required Python packages. | pip install -r requirements.txt |
Project Structure
This project is thoughtfully organized to support the development, training, and evaluation of the DnCNN model efficiently. Below is a concise overview of the directory structure and their specific roles:
- checkpoints/
- Stores model checkpoints during training for later resumption.
-
best_model/
-
Contains the best-performing model checkpoints as determined by validation metrics.
-
train_models/
-
Houses all model checkpoints generated throughout the training process.
-
data/
-
processed/: Processed data ready for modeling, having undergone normalization, augmentation, or encoding.
-
raw/: Original, unmodified data serving as the baseline for all preprocessing.
-
logs/
-
Log files for debugging and tracking model training progress.
-
metrics/
-
Files related to model performance metrics for evaluation purposes.
-
outputs/
-
test_images/: Images generated during the testing phase, including segmentation outputs.
- train_gif/: GIFs compiled from training images showcasing the model's learning progress.
-
train_images/: Images generated during training for performance visualization.
-
research/
-
notebooks/: Jupyter notebooks for research, experiments, and exploratory analyses conducted during the project.
-
src/
-
Source code directory containing all custom modules, scripts, and utility functions for the U-Net model.
-
unittest/
- Unit tests ensuring code reliability, correctness, and functionality across various project components.
Dataset Organization for Semantic Image Segmentation
The dataset is organized into three categories for semantic image segmentation tasks: benign, normal, and malignant. Each category directly contains paired images and their corresponding segmentation masks, stored together to simplify the association between images and masks.
Directory Structure:
images/
├── clean_images/
│ │ ├── 1.png
│ │ ├── 2.png
│ │ ├── ...
├── noise_images/
│ │ ├── 1.png
│ │ ├── 2.png
│ │ ├── ...
Naming Convention:
- Images and Masks: Within each category folder, images and their corresponding masks are stored together. The naming convention for images is
(n).png, and for masks, it is in Segmented(n).png, where it represents the type of the image (benign, normal, or malignant), and(n)is a unique identifier. This convention facilitates easy identification and association of each image with its respective mask.
For detailed documentation on the dataset visit the Dataset - GitHub.
Code - GitHub
For detailed implementation and usage - CLI, visit the -> DnCNN: GitHub.
Command Line Usage
python cli.py --help
CLI - Arguments
| Argument | Type | Default | Description |
|---|---|---|---|
--image_path |
str | ./data/data.zip |
Path to the zip file containing the dataset. |
--batch_size |
int | 16 |
Batch size for training and testing. |
--image_size |
int | 64 |
The size to which the images will be resized. |
--split_ratio |
float | 0.2 |
The ratio of the dataset to be used as the test set. |
--epochs |
int | 100 |
Number of training epochs. |
--lr |
float | 1e-4 |
Learning rate for the optimizer. |
--device |
str | mps |
Computing device (cuda, cpu, mps). |
--display |
bool | True |
Whether to display training progress and metrics. |
--beta1 |
float | 0.9 |
Beta1 hyperparameter for Adam optimizer. |
--train |
flag | N/A | Flag to initiate model training. |
--test |
flag | N/A | Flag to initiate model testing and visualization. |
--adam |
bool | True |
Whether to use Adam optimizer. |
--SGD |
bool | False |
Whether to use Stochastic Gradient Descent (SGD) optimizer. |
--is_lr_scheduler |
bool | False |
Whether to use learning scheduler optimizer. |
--is_l1 |
bool | False |
Whether to use L1 regularization. |
--is_l2 |
bool | False |
Whether to use L2 regularization. |
--is_huber_loss |
bool | False |
Whether to use Huber loss as the training criterion. |
--is_weight_clip |
bool | False |
Whether to apply weight clipping. |
Training and Testing
Training the Model
To train the model, you need a dataset in a zip file specified by --image_path, along with any other configurations you wish to customize.
- Using CUDA (for NVIDIA GPUs):
python cli.py --image_path "/path/to/dataset.zip" --batch_size 4 --image_size 128 --split_ratio 0.25 --epochs 50 --lr 0.001 --display True --device cuda --train
- Using MPS (for Apple Silicon GPUs):
python cli.py --image_path "/path/to/dataset.zip" --batch_size 4 --image_size 128 --split_ratio 0.25 --epochs 50 --lr 0.001 --display True --device mps --train
- Using CPU:
python cli.py --image_path "/path/to/dataset.zip" --batch_size 4 --image_size 128 --split_ratio 0.25 --epochs 50 --lr 0.001 --display True --device cpu --train
Testing the Model
Ensure you specify the device using --device if different from the default. The test process can be initiated with the --test flag.
- Using CUDA (for NVIDIA GPUs):
python cli.py --device cuda --test
- Using MPS (for Apple Silicon GPUs):
python cli.py --device mps --test
- Using CPU:
python cli.py --device cpu --test
Import Custom Modules
Modules Overview
The implementation leverages custom modules for flexible data handling (Loader), model training (Trainer), and evaluation (Charts). These modules support device-specific optimizations to ensure efficient execution across different hardware platforms.
Arguments
To provide a clear overview of the arguments used in the example setup, below is a table along with explanations for each argument. This table format and descriptions aim to aid in understanding how these arguments influence the training process and model configuration.
| Argument | Type | Default Value | Description |
|---|---|---|---|
epochs |
int | 50 | The total number of training epochs to run. This defines how many times the entire dataset is passed through the network. |
lr |
float | 0.0001 | Learning rate for the optimizer. It controls the step size at each iteration while moving toward a minimum of the loss function. |
device |
str | "cuda" | Specifies the device on which the model will run. Options include "cuda" for NVIDIA GPUs, "mps" for Apple Silicon GPUs, and "cpu" for the CPU. |
display |
bool | True | If set to True, training progress and metrics will be displayed. Otherwise, the training progress will not be printed to the console. |
beta1 |
float | 0.9 | The exponential decay rate for the first moment estimates in the Adam optimizer. It controls the momentum term. |
adam |
bool | True | If True, the Adam optimizer is used. If False, and SGD is True, the SGD optimizer is used instead. |
SGD |
bool | False | If True (and adam is False), the SGD optimizer is used for training. |
is_lr_scheduler |
bool | False | Determines whether a learning rate scheduler is used. A scheduler adjusts the learning rate based on the number of epochs. |
is_l1 |
bool | False | If True, L1 regularization is applied to the model parameters. This encourages sparsity in the model weights. |
is_l2 |
bool | False | If True, L2 regularization is applied, which helps prevent the model weights from growing too large. |
is_huber_loss |
bool | False | If True, the Huber loss function is used instead of the default loss function. Huber loss is less sensitive to outliers than the squared error loss. |
is_weight_clip |
bool | False | Enables weight clipping if set to True. This limits the weights to stay within a specified range to prevent exploding gradients. |
Usage
Preparing Data
The Loader module is responsible for preparing the data for training and testing. It unzips the dataset, resizes images, and splits the data according to the specified ratio.
loader = Loader(
    image_path="./data/data.zip",
    batch_size=32,
    image_size=64,
    split_ratio=0.2,
)
loader.unzip_folder()
dataloader = loader.create_dataloader()
Training the Model
The Trainer module handles the model's training process, including setting up the optimizer, loss function, and executing the training loops.
trainer = Trainer(
    epochs=50,
    lr=0.0001,
    device="cuda",  # Change to "cpu" or "mps" as needed
    display=True,
    beta1=0.9,
    adam=True,
    SGD=False,
    is_lr_scheduler=False,
    is_l1=False,
    is_l2=False,
    is_huber_loss=False,
    is_weight_clip=False,
)
trainer.train()
Trainer.display_metrics()
Evaluating the Model
The Charts module provides functionality for visualizing the denoising results of the trained model on test images.
charts = Charts(
    device="cuda",  # Change to "cpu" or "mps" as needed
)
charts.plot()
from IPython.display import Image

# Display the result image
Image("/content/DnCNN/outputs/test_images/result.png")

# Display the loss curve image
Image("/content/U-Net/metrics/metrics.png")